3-D Ready HDTV 3D Glasses Test
Click here for: The 3D Ready Television Test Image Instructions
Troubleshooting
General
On some PC’s the televisions speakers, or home theater audio system must be connected to the sound card of the computer via the “1/8” mini stereo jack in order for the DVD to be properly played.
For Mitsubishi televisions, you must name the HDMI port you are using either “Game” or “PC” using the televisions remote control, in order to access the “3D on/off” control.
On Samsung televisions, be sure to turn the 3D on via the “3D” button on the remote. If your remote does not have a “3D button, this is turned on within the settings menu in the televisions on screen menu.
1. The image on the television looks like it is in 3D, but the glasses aren’t working.
There are several possible reasons for this:
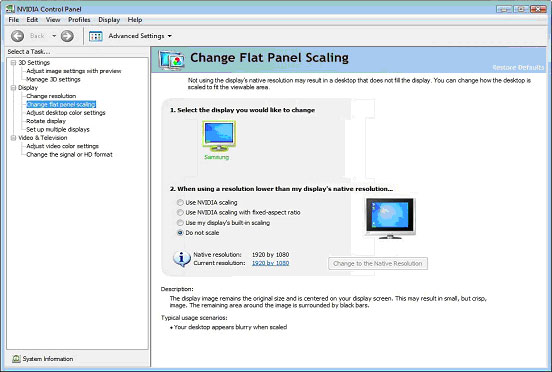
A. Do you see the entire “PC” Desktop” on your television? If so, your television is “scaling” the image. You need to set your video card to not scale. If you have an Nvidia based video card, you will be able to make this change from the Nvidia Control Panel as shown below:
If your video card is an ATI card, the change is made in the ATI control center as shown below:
When set properly, the icons on your desk top will appear to be “cut off”. Please note, resetting the image to not resize may require you to re-boot your computer.
2. The 3D is set to the wrong mode.
On your PC keyboard the “D” button is a hot-key to set the 3D to various modes.
These modes are:
“DVD Input Type: 2D”. This for conversion of standard 2D programming into 3D
“DVD Input Type: 3Di (Right)”. This is for Interlaced or Field Sequential 3D formatted DVD’s where the right eye image is shown first, then the left eye image.
“DVD Input Type: 3Di (Left)”. This is for Interlaced or Field Sequential 3D formatted DVD’s where the left eye image is shown first, then the right eye image.
If the image doesn’t “Look Right”, try hitting the “D” key to see if the image improves. Please note, when doing 2D to 3D conversions you may need to adjust the stereo separation. To do this, simply drag your mouse to the bottom of the screen. A tool bar will appear at the bottom of your picture. The icon on the far right is the stereo separation. Simply drag your mouse on the button to the left to decrease the separation, and to the right to increase it.
3. I’ve done everything above, and still am not getting 3D. What next?
To determine if the problem is hardware related or software related please see the image section at the top of this web page.
4. From doing the above tests, I can tell the hardware is working. But, obviously the software isn’t. What’s my next step?
Send an email to tridefsupport@ddd.com with as complete a description of the problem as you can. They normally respond within 1-2 business days. Unfortunately, they do not offer telephone tech support.
Click here for: The 3D Ready Television Installation Instructions
Like us on Facebook and your automatically entered into our weekly drawing to win your choice of fun prizes including FREE 3D Glasses or 2 FREE 3D Blu-rays of your choice!
Click on the like button above to be automatically entered into our weekly drawing. Thanks!


